0%

2020 年百度之星·程序设计大赛

百度之星
然而,今天又是被高中生暴打的一天…rank1177走了

1001 drink
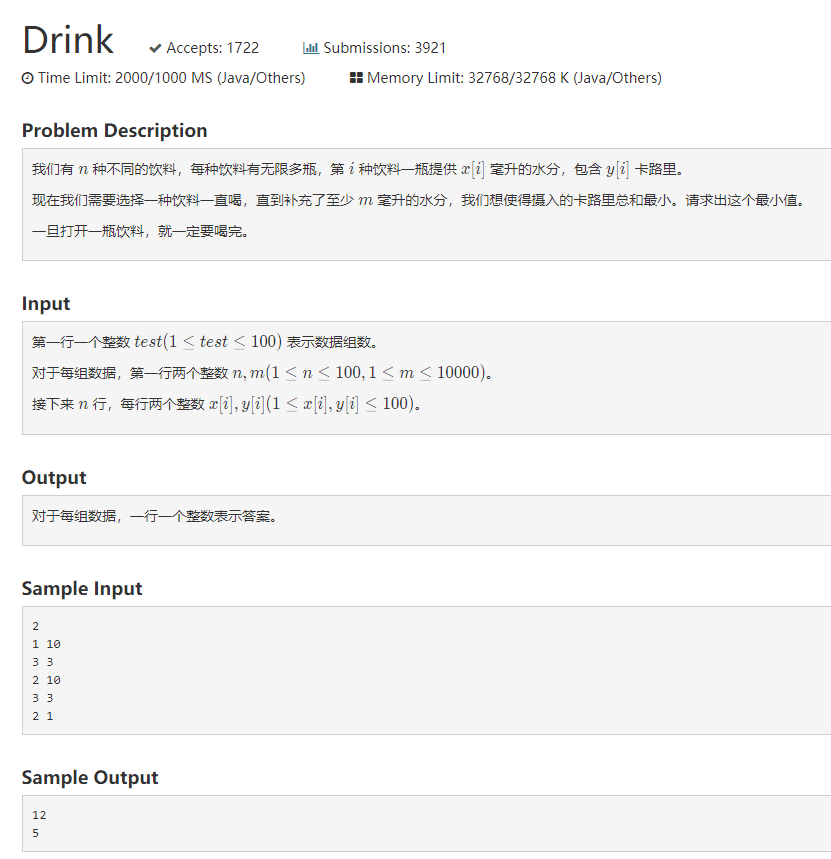
drink

1
2
3
4
5
6
7
8
9
10
11
12
13
14
15
16
17
18
19
20
21
22
23
24
25
26
27
28
29
30
31
32
33
34
35
36
37
38
#include<iostream>
#include<vector>
using namespace std;


class drink {
public:
int x;
int y;
drink(int _x, int _y) : x(_x), y(_y) {}
};
int main(){
int test;
cin >> test;
int n, m; // drinksN, water
for (int i = 0; i < test; ++i) {
cin >> n >> m;
vector<drink> drinks;
int x, y;
for (int j = 0; j < n; ++j) {
cin >> x >> y;
drinks.push_back(drink(x, y));
}
// main
int min = INT_MAX;
for (drink d : drinks) {
int number = m / d.x;
int rest = m % d.x;
if (rest != 0)
number++;
int res = number * d.y;
if (res < min)
min = res;
}
cout << min << endl;
}
return 0;
}

1002 GPA
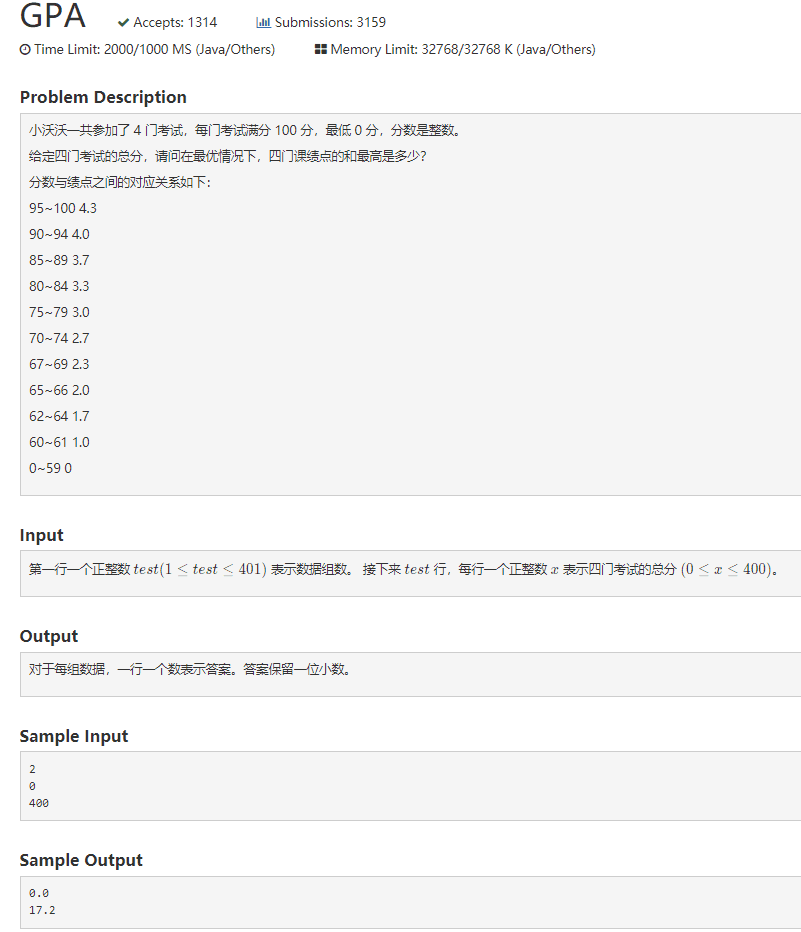
GPA

1
2
3
4
5
6
7
8
9
10
11
12
13
14
15
16
17
18
19
20
21
22
23
24
25
26
27
28
29
30
31
32
33
34
35
36
37
38
39
40
41
42
43
44
45
46
47
48
49
50
51
52
#include<iostream>
#include<algorithm>
using namespace std;
double Max;
int scores[11] = { 95,90,85,80,75,70,67,65,62,60,0 };
double gpa[11] = { 4.3,4.0,3.7,3.3,3.0,2.7,2.3,2.0,1.7,1.0,0 };
double calc(double score){
if (score >= 95)
return 4.3;
else if (score >= 90)
return 4.0;
else if (score >= 85)
return 3.7;
else if (score >= 80)
return 3.3;
else if (score >= 75)
return 3.0;
else if (score >= 70)
return 2.7;
else if (score >= 67)
return 2.3;
else if (score >= 65)
return 2.0;
else if (score >= 62)
return 1.7;
else if (score >= 60)
return 1.0;
else
return 0.0;
}
void dfs(int cur, int sum, double score){
if (sum < 0)
return;
if (cur == 3){
Max = max(Max, calc(sum) + score);
return;
}
for (int j = 0; j < 11; j++)
dfs(cur + 1, sum - scores[j], score + gpa[j]);
}
int main()
{
int test, n;
cin >> test;
for (int i = 0; i < test; ++i) {
cin >> n;
Max = 0;
dfs(0, n, 0);
//cout << Max << endl;
printf("%.1lf\n", Max);
}
}

1003 Dec
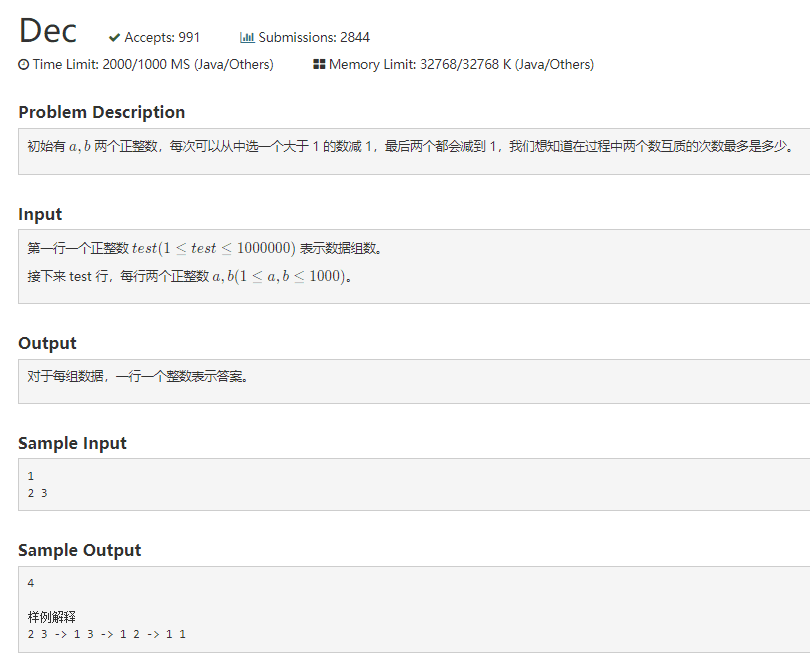
dec
不加前面的tie就会TLE,也不知道为啥,也许是输入输出太多了

1
2
3
4
5
6
7
8
9
10
11
12
13
14
15
16
17
18
19
20
21
22
23
24
25
26
27
28
29
30
31
32
33
34
35
36
37
#include<iostream>
#include<algorithm>
#include<vector>
using namespace std;

int gcd(int a, int b) {
if (b == 0)
return a;
return gcd(b, a % b);
}

int main(){
ios::sync_with_stdio(0);
cin.tie(0);
cout.tie(0);
int test, a, b;
cin >> test;
vector<vector<int>> v(1001, vector<int>(1001, 0));
for (int i = 1; i <= 1000; ++i) {
for (int j = 1; j <= 1000; ++j) {
if (gcd(i, j) == 1) {
v[i][j] = max(v[i][j - 1], v[i - 1][j]) + 1;
}
else {
v[i][j] = max(v[i][j - 1], v[i - 1][j]);
}
}
}
for (int i = 0; i < test; ++i) {
cin >> a >> b;
if (a < b)
cout << v[a][b] << endl;
else
cout << v[b][a] << endl;
}
return 0;
}

1004 Civilization
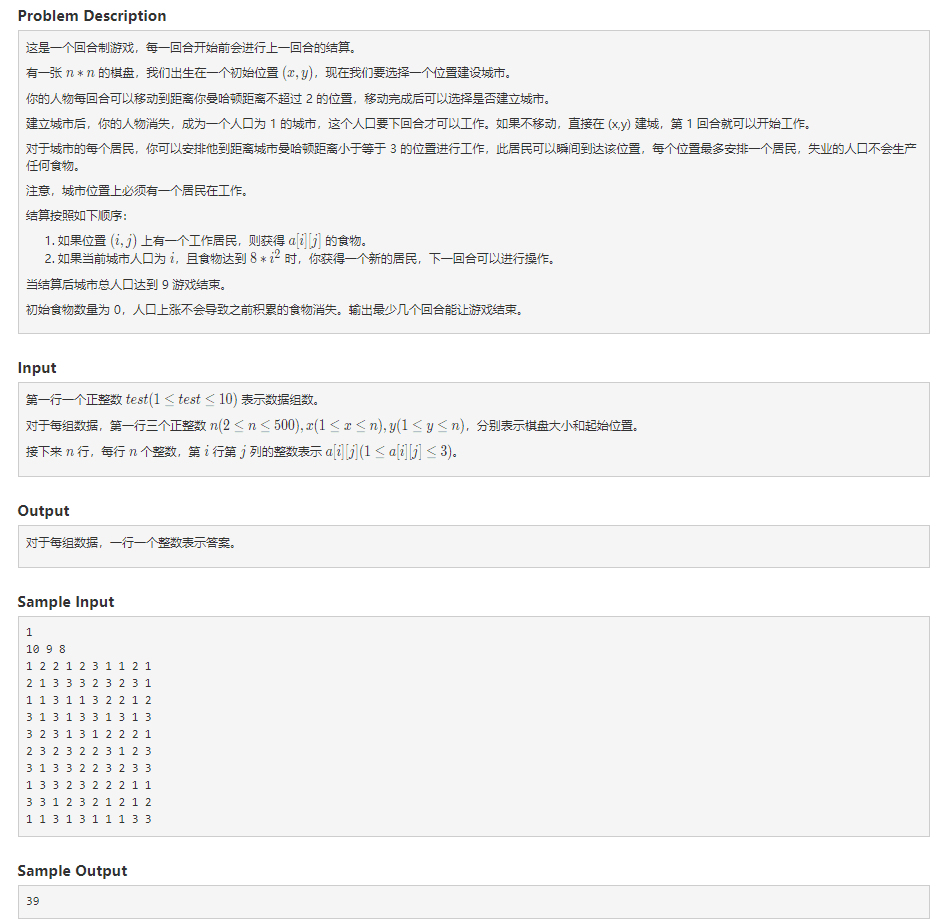
civilization

1005 Rotate

rotate

1006 matrix

matrix

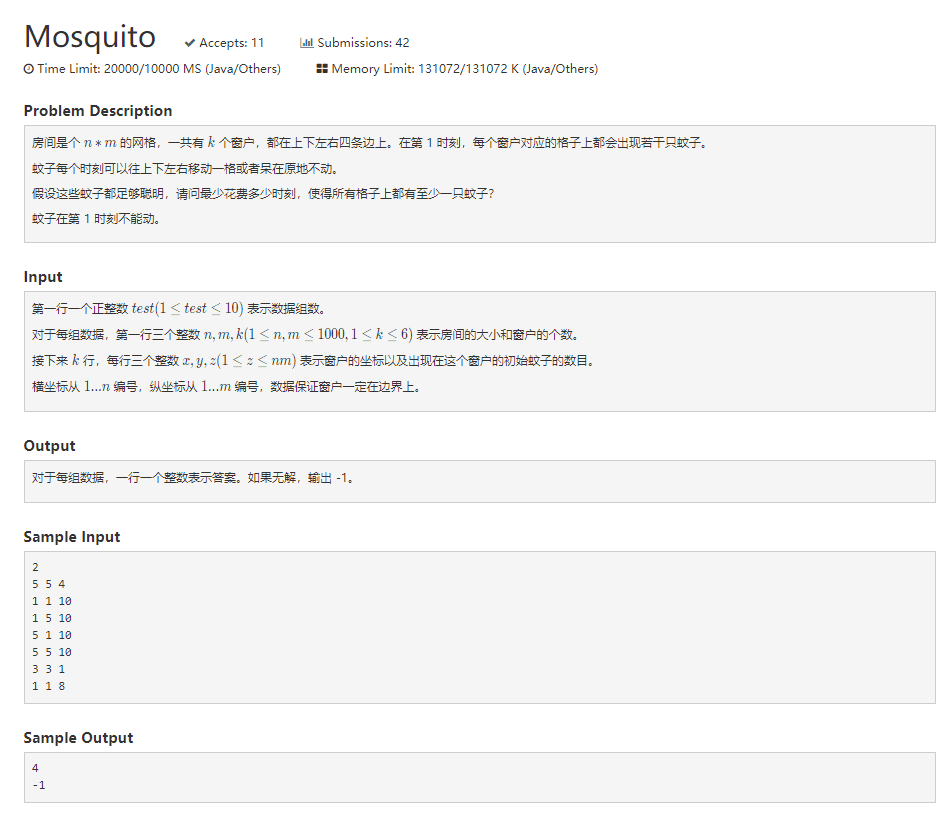
1007 Mosquito

Mosquito

1008 Function

Function

本地git仓库push到账号里的新建仓库里

1
2
3
4
5
6
7
8
9
10
11
12
13
14
15
// 已存在分支,使用强推
git remote add origin <仓库地址>
git push origin master:master -f

// 已存在分支,不能强推
git remote add origin <仓库地址>
git branch --set-upstream-to=origin/master master
//rebase 先把远端的代码拉到本地,插入本地代码提交log的最底下,即变基
git rebase
git push

// 远程分支不存在
git remote add origin <仓库地址>
// 本地master分支push到远端master分支
git push origin master:master

Reference

如何将已有的GIT本地仓库push到新建的远程仓库

线程池创建后,通过append函数来给线程池里加入task,通过任务队列来维护这些task,在线程池的内部使用互斥锁来保护线程池,用一个sem变量来表示现在是否有task需要去运行。
在thread内有一个static void* worker类型的函数,它就是创建的threadNum个线程所共用的一个线程执行函数,传入的argthis,即该threadPool实例的内存地址,然后强制类型转换后,通过pool->run调用run函数来执行真正的逻辑。

1
2
3
4
5
6
7
8
9
10
11
12
13
14
15
16
17
18
19
20
21
22
23
24
25
26
27
28
29
30
31
32
33
34
35
36
37
38
39
40
41
42
43
44
45
46
47
48
49
50
51
52
53
54
55
56
57
58
59
60
61
62
63
64
65
66
67
68
69
70
71
72
73
74
75
76
77
78
79
80
81
82
83
84
85
86
87
88
89
90
91
92
93
94
95
96
97
98
99
100
101
102
103
104
105
106
107
108
109
110
#ifndef THREADPOOL_H
#define THREADPOOL_H

#include<iostream>
#include<pthread.h>
#include<assert.h>
#include<vector>
#include<queue>

#include "lock.h"

using namespace std;

template<class T>
class threadPool{
private:
int threadNum;
int maxRequestNum;
pthread_t* threads = nullptr;
queue<T*> workQueue;
locker poolLocker;
sem queueState; // whether has tasks to do ? P/V operation

static void *worker(void *arg);// pull task from workQueue
void run();
public:
threadPool(int thread_number = 8, int max_request = 10000);
~threadPool();
bool append(T *request, int state);
bool append_p(T *request);
};

template<class T>
threadPool<T>::threadPool(int _threadNum, int _maxRequestNum){
if(_threadNum == 0 || _maxRequestNum == 0)
assert(0);
threadNum = _threadNum;
maxRequestNum = _maxRequestNum;

threads = new pthread_t[_threadNum];
assert(threads != nullptr);

for(int i = 0; i < _threadNum; ++i){
int ret = pthread_create(threads + i, NULL, worker, this); // public static void worker(){...}
if(ret != 0){
delete[] threads;
throw std::exception();
}
ret = pthread_detach(threads[i]);
if(ret != 0){
delete[] threads;
throw std::exception();
}
}
//std::cout << "init finished" << endl;
}

template<class T>
threadPool<T>::~threadPool(){
delete[] threads;
}

template<class T>
bool threadPool<T>::append(T *request, int state){
poolLocker.lock();
if(workQueue.size() >= threadNum){
poolLocker.unlock();
return false;
}
workQueue.push(request);
queueState.post(); // V: +1
poolLocker.unlock();

return true;
}

template<class T>
void* threadPool<T>::worker(void *arg){
threadPool* pool = (threadPool*) arg; // this
pool->run();
return pool;
}

template<class T>
void threadPool<T>::run(){
while(true){
/*
* P operation. if > 0, reduce 1 and return; else block until it > 0
* if there are no task to do, all threads will block here.
* else some threads will reduce and continue to run the following code.
*/
queueState.wait();

poolLocker.lock();
if(workQueue.empty()){ // there are no task in the workQueue, loop until workQueue is not empty
poolLocker.unlock();
continue;
}
T* request = workQueue.front();
workQueue.pop();
poolLocker.unlock();
if (!request){
std::cout << "request is null" << std::endl;
continue;
}

request->work(); // request is workinng !
}
}
#endif

这里对lock进行了一些封装,简化了lock、sem的调用,简化了threadPool的成员变量的结构。

1
2
3
4
5
6
7
8
9
10
11
12
13
14
15
16
17
18
19
20
21
22
23
24
25
26
27
28
29
30
31
32
33
34
35
36
37
38
39
40
41
42
43
44
45
46
47
48
49
50
51
52
53
54
55
56
57
58
59
60
61
62
63
64
65
66
67
68
69
70
71
72
73
74
75
76
77
78
79
80
81
82
83
84
85
86
87
88
89
90
#ifndef LOCK_H
#define LOCK_H

#include <exception>
#include <pthread.h>
#include <semaphore.h>

class sem{
public:
sem(){
if (sem_init(&m_sem, 0, 0) != 0){
throw std::exception();
}
}
sem(int num){
if (sem_init(&m_sem, 0, num) != 0){
throw std::exception();
}
}
~sem(){
sem_destroy(&m_sem);
}
bool wait(){
return sem_wait(&m_sem) == 0;
}
bool post(){
return sem_post(&m_sem) == 0;
}
private:
sem_t m_sem;
};
class locker{
public:
locker(){
if (pthread_mutex_init(&m_mutex, NULL) != 0){
throw std::exception();
}
}
~locker(){
pthread_mutex_destroy(&m_mutex);
}
bool lock(){
return pthread_mutex_lock(&m_mutex) == 0;
}
bool unlock(){
return pthread_mutex_unlock(&m_mutex) == 0;
}
pthread_mutex_t *get(){
return &m_mutex;
}
private:
pthread_mutex_t m_mutex;
};
class cond{
public:
cond(){
if (pthread_cond_init(&m_cond, NULL) != 0){
//pthread_mutex_destroy(&m_mutex);
throw std::exception();
}
}
~cond(){
pthread_cond_destroy(&m_cond);
}
bool wait(pthread_mutex_t *m_mutex){
int ret = 0;
//pthread_mutex_lock(&m_mutex);
ret = pthread_cond_wait(&m_cond, m_mutex);
//pthread_mutex_unlock(&m_mutex);
return ret == 0;
}
bool timewait(pthread_mutex_t *m_mutex, struct timespec t){
int ret = 0;
//pthread_mutex_lock(&m_mutex);
ret = pthread_cond_timedwait(&m_cond, m_mutex, &t);
//pthread_mutex_unlock(&m_mutex);
return ret == 0;
}
bool signal(){
return pthread_cond_signal(&m_cond) == 0;
}
bool broadcast(){
return pthread_cond_broadcast(&m_cond) == 0;
}

private:
//static pthread_mutex_t m_mutex;
pthread_cond_t m_cond;
};
#endif

worker就是一个task的实例,通过threadPoolappend函数来提交task,然后在threadPoolrun函数里调用相应的功能。

1
2
3
4
5
6
7
8
9
10
11
12
13
14
15
16
17
#ifndef WORKER_H_
#define WORKER_H_

#include<iostream>

class worker{
public:
worker(int i):id(i){}
void work(){
std::cout << "worker: " << id << std::endl;
}
int getId(){return id;}
private:
int id;
};

#endif

初始化线程池没什么好说的。但是在append提交时会存在线程池满载而提交失败的问题,这时返回false,所以需要通过while(append)来持续提交。

1
2
3
4
5
6
7
8
9
10
11
12
13
14
15
16
17
18
19
20
21
22
23
24
#include<iostream>
#include<vector>

#include "threadPool.h"
#include "worker.h"
#include <unistd.h>

using namespace std;

int main(){
threadPool<worker>* pool = new threadPool<worker>(8, 10000);
vector<worker*> workers;
for(int i = 0; i < 20; ++i){
workers.push_back(new worker(i));
}

for(worker* w: workers){
while(!pool->append(w, 0)){

}
}
pause();
return 0;
}

最后给出makefile,记住需要加入lpthread flag

1
2
3
4
5
app: main.cpp threadPool.h worker.h lock.h
g++ -o app $^ -g -lpthread

clean:
rm -r app

40个task的运行结果如下
res

Reference

线程同步之信号量

环境准备

  • Linux下自带make,如果没有sudo apt install make即可
  • Windows下使用make比较麻烦,因为MinGW实际上是Linux的gcc在Windows下的移植版本,而make的名字不叫make,所以需要改exe的名字
    在MinGW的bin目录下将mingw32-make.exe改成make,如果你配置好了MinGW的环境变量,这里理所应当的可以直接在terminal里调用make的,然后就可以从事makefile的编写了
    make

makefile的编写:基础版

假设你有main.cpp, func1.cpp, func2.cpp三个独立的cpp文件,然后希望将其编译到成一个可执行文件res(这里和编译时的强类型和弱类型有关,实际上并不推荐这种写法)

1
2
3
4
res: main.cpp func1.cpp func2.cpp
g++ -g main.cpp func1.cpp func2.cpp -o res
clean:
del *.o res.exe

  • 有两个重要的问题:
    • 项目比较大的时候,一行规则不够
    • 改一个文件就要整个项目重新编译,很蠢

makefile的编写:进阶版

这里采用了header.h文件让main.cpp能够比较靠谱地调用另外两个cpp文件里的函数。在header.h文件里声明他们,然后在func1.cpp和func2.cpp文件里实现

1
2
3
4
5
6
7
8
9
10
11
12
13
14
15
16
17
18
19
20
21
22
23
24
25
26
27
28
29
30
31
32
33
34
35
// header.h
#pragma
#include<iostream>
using namespace std;
class listNode{
public:
int val;
listNode* next;
listNode(int v):val(v), next(nullptr){}
};
void func1();// only declared
void func2();// only declared

// func1.cpp
#include<iostream>
#include "header.h"
using namespace std;

void func1(){
cout << "func1" << endl;
}

//fun2.cpp
...

// main.cpp
#include "header.h"
#include<iostream>
using namespace std;
int main(){
func1();
func2();
system("pause");
return 0;
}

然后makefile的编写如下所示:

1
2
3
4
5
6
7
8
9
10
res: main.o func1.o func2.o
g++ main.o func1.o func2.o -o res
main.o: main.cpp header.h
g++ -c main.cpp -o main.o
func1.o: func1.cpp
g++ -c func1.cpp -o func1.o
func2.o: func2.cpp
g++ -c func2.cpp -o func2.o
clean:
del *.o res.exe

  • 优点:当有一个文件发生改动时,只需重新编译此文件即可,而无需重新编译整个项目
  • 缺点:
    • 里面存在一些重复的内容,可以考虑用变量代替
    • 后面三条规则非常类似,可以考虑用一条模式规则代替

makefile的编写:高级版

1
2
3
4
5
6
7
8
9
obj = main.o func1.o func2.o
target = res
CC = g++
$(target): $(obj)
$(CC) $(obj) -o $(target)
%.o: %.c
$(CC) -c $< -o $@
clean:
del *.o res.exe

使用的规则如下:即所有的.o文件都由对应的.c文件生成。

1
2
%.o: %.c  
$(CC) -c $< -o $@

  • 自动变量有很多种:
    • $<:第一个依赖文件
    • $@:目标
    • $^:所有不重复的依赖文件,以空格分开
  • 优点:可以减少重复的内容
  • 缺点:
    • obj对应的文件需要一个个输入,工作量大
    • 文件数目比较少时还好,文件数目一旦很多的话,obj将很长
    • 而且每增加/删除一个文件,都需要修改Makefile

makefile的编写:究极版

有两个重要函数:wildcardpatsubst


然后我就不会了,平时也没什么机会用到

1
2
3
4
5
6
7
8
9
10
11
12
13
14
15
src = $(wildcard ./*.c)  
obj = $(patsubst %.c, %.o, $(src))
#obj = $(src:%.c=%.o)
target = app
CC = gcc

$(target): $(obj)
$(CC) $(obj) -o $(target)

%.o: %.c
$(CC) -c $< -o $@

.PHONY: clean
clean:
rm -rf $(obj) $(target)

Reference

在Windows下使用make命令
如何系统地学习 Makefile 相关的知识(读/写)

安装

  • 从官网下载一个iso文件,然后按照VMware的流程走一遍即可。初始的硬盘设置大一点没关系,没有用到的不会分配的。然后硬盘保存要设置为单个文件最好
  • 然后用VMware打开它,耐心等待即可

VMware workstation pro激活

可以采用教育特惠,认证一下就可以获得一年的。同时也可以进行破解,永久激活密钥有这些

1
2
3
4
5
6
YG5H2-ANZ0H-M8ERY-TXZZZ-YKRV8
UG5J2-0ME12-M89WY-NPWXX-WQH88
UA5DR-2ZD4H-089FY-6YQ5T-YPRX6
GA590-86Y05-4806Y-X4PEE-ZV8E0
ZF582-0NW5N-H8D2P-0XZEE-Z22VA
YA18K-0WY8P-H85DY-L4NZG-X7RAD

屏幕自适应问题

因为缺少vmtools。但是我从VMware workstation pro里看它是灰色的,后来发现需要进行下面三个操作

  • 关闭虚拟机
  • 在虚拟机设置分别设置CD/DVD、CD/DVD2和软盘为自动检测三个步骤
  • 再重启虚拟机,灰色字即点亮

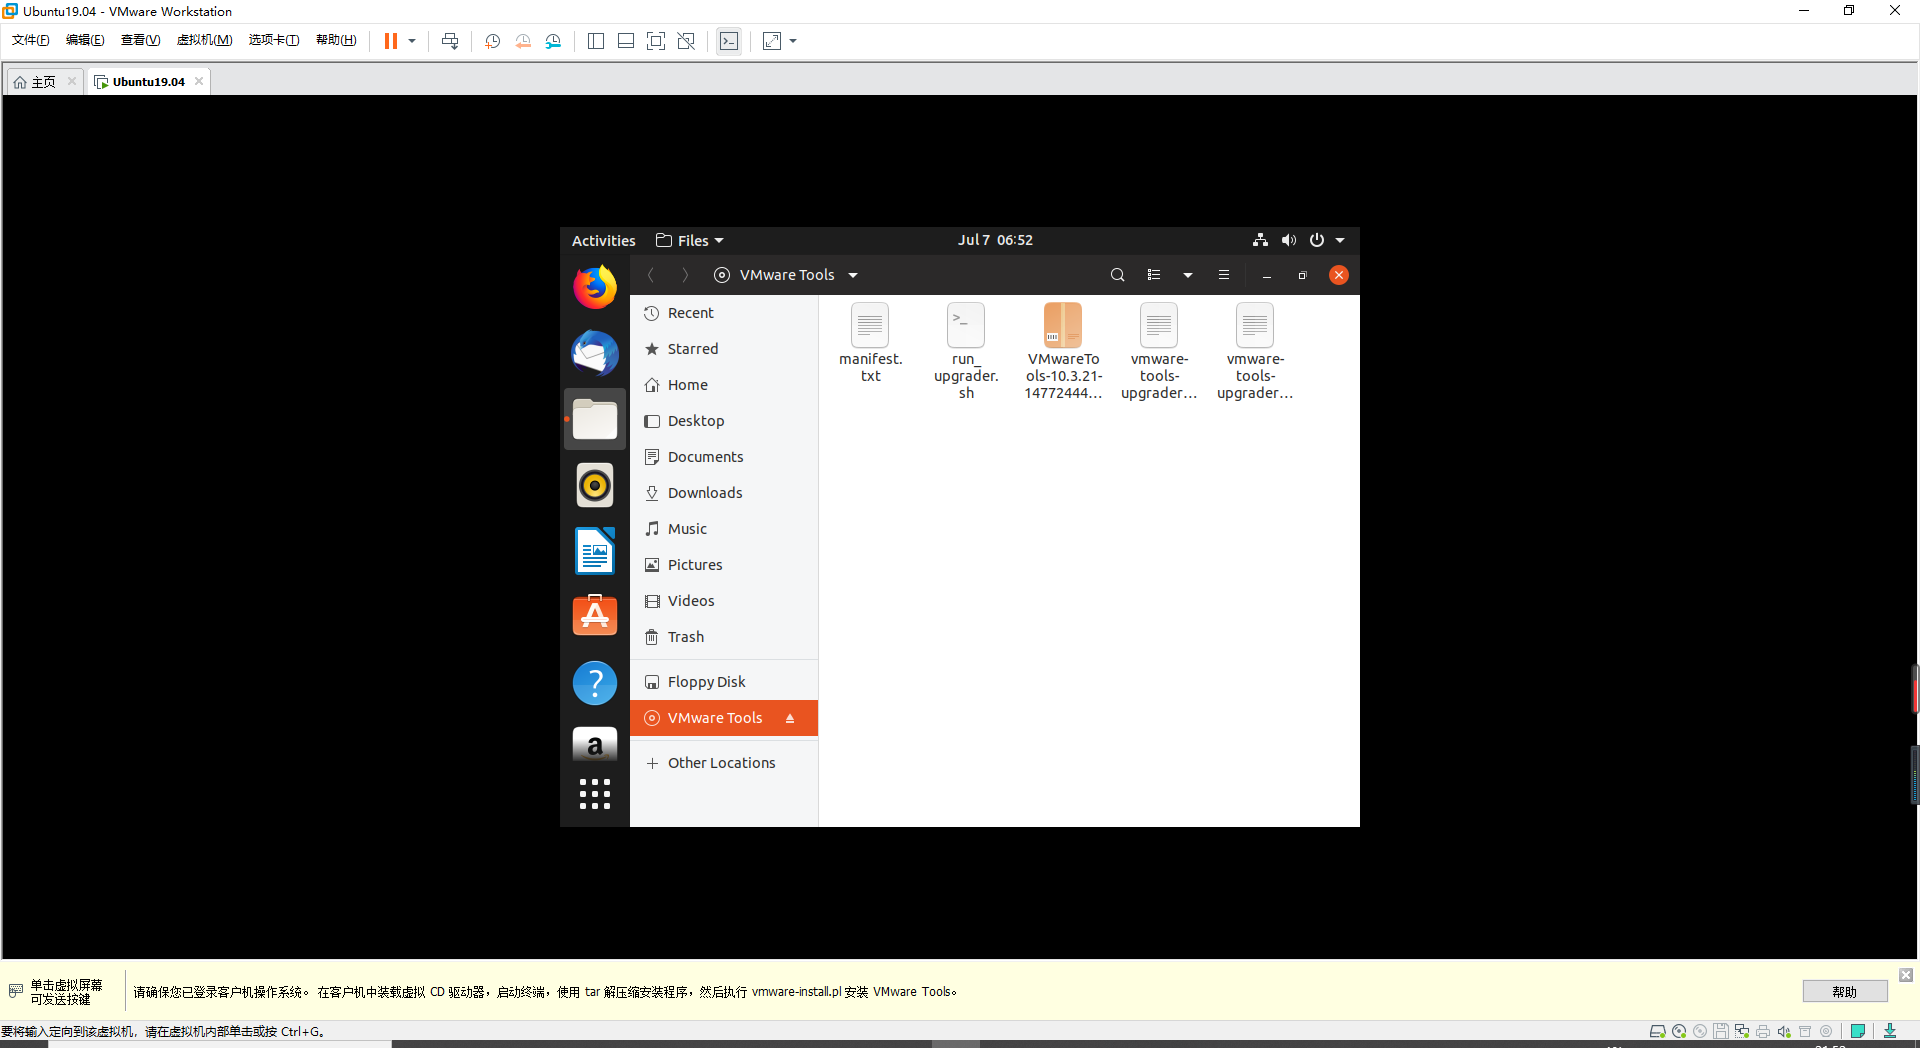
下载好后就是下面的样子
vmtools
解压这个文件夹,然后执行其中的pl文件即可

1
2
cd vmware-tools-distrib
sudo ./vmware-install.pl

apt安装失败

1
2
3
4
5
6
Reading package lists... Done
Building dependency tree
Reading state information... Done
Package vim is not available, but is referred to by another package.
This may mean that the package is missing, has been obsoleted, or
is only available from another source

这种问题是指软件源已经旧了,需要更新,所以执行sudo apt-get update但是又因为软件源旧了所以这就是一个先有鸡还是先有蛋的问题~ 所以从更新软件源下手

更换软件更新源

1
2
3
cd /etc/apt/
sudo mv sources.list sources.list.bak
sudo gedit sources.list

然后把文件里的所有内容替换成国内源。要注意源和系统的版本是否匹配!从https://mirrors.ustc.edu.cn/repogen/去搜索指定系统的指定源。切记不要随便从网上拿一个源过来用

1
2
3
4
5
6
7
8
9
10
11
deb https://mirrors.ustc.edu.cn/ubuntu/ bionic main restricted universe multiverse
deb-src https://mirrors.ustc.edu.cn/ubuntu/ bionic main restricted universe multiverse
deb https://mirrors.ustc.edu.cn/ubuntu/ bionic-security main restricted universe multiverse
deb-src https://mirrors.ustc.edu.cn/ubuntu/ bionic-security main restricted universe multiverse
deb https://mirrors.ustc.edu.cn/ubuntu/ bionic-updates main restricted universe multiverse
deb-src https://mirrors.ustc.edu.cn/ubuntu/ bionic-updates main restricted universe multiverse
deb https://mirrors.ustc.edu.cn/ubuntu/ bionic-backports main restricted universe multiverse
deb-src https://mirrors.ustc.edu.cn/ubuntu/ bionic-backports main restricted universe multiverse
## Not recommended
# deb https://mirrors.ustc.edu.cn/ubuntu/ bionic-proposed main restricted universe multiverse
# deb-src https://mirrors.ustc.edu.cn/ubuntu/ bionic-proposed main restricted universe multiverse

最后执行sudo apt-get update即可

apt安装vim的问题

1
2
3
4
5
6
7
8
9
10
11
12
eading package lists... Done
Building dependency tree
Reading state information... Done
Some packages could not be installed. This may mean that you have
requested an impossible situation or if you are using the unstable
distribution that some required packages have not yet been created
or been moved out of Incoming.
The following information may help to resolve the situation:

The following packages have unmet dependencies:
vim : Depends: vim-common (= 2:8.0.1453-1ubuntu1.3) but 2:8.1.0320-1ubuntu3 is to be installed
E: Unable to correct problems, you have held broken packages.

软件包依赖有问题

1
2
sudo apt-get purge vim-common //会同时清除软件包和软件的配置文件,彻底地删除
sudo apt install vim

安装steam

1
2
3
sudo add-apt-repository multiverse
sudo apt update
sudo apt install steam

第一行是增加对第三方非自由软件库的支持,就是说系统支持第三方非自由软件。
第二个命令更新软件包。
第三个应该都知道是安装steam。就是打开对第三方软件的支持。
效果如下所示:
steam

Reference

Ubuntu16.04安装steam
https://mirrors.ustc.edu.cn/repogen/

目的

在Windows环境下使用makefile来编译C++,而不是在Linux系统中。虚拟机开得太烦了

准备材料

  • VSCode:官网下载就OK,没什么好说的
  • MinGW

MinGW配置

  • 下载压缩包:
    不应该直接点击Download Latest Version,不然下载下来的我也不知道怎么用….
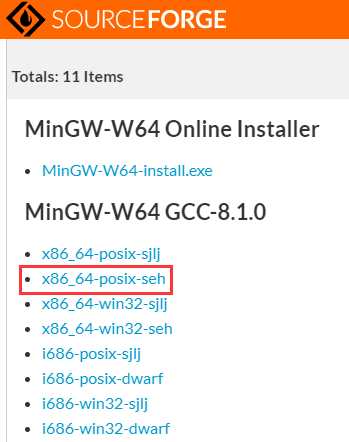
    应该进入https://sourceforge.net/projects/mingw-w64/files/,然后滑到下面,点击url
    MinGW
    这时会得到一个名字为x86_64-8.1.0-release-posix-seh-rt_v6-rev0.7z的7z类型压缩包,这就是gcc-8.1.0,将其解压,得到包含MinGW的文件夹。
  • 配置环境变量
    XX用户变量和系统变量里的Path里添加入MinGW/bin的绝对路径。
    win+R后,输入cmd,打开terminal,输入g++或者gcc,如果出现以下log说明配置成功。最好重启一下
    1
    2
    3
    4
    5
    g++: fatal error: no input files
    compilation terminated.

    gcc: fatal error: no input files
    compilation terminated.

在VSCode中编写

首先要知道各种替换变量的意思。

1
2
3
4
5
6
7
8
9
10
${workspaceFolder} - the path of the folder opened in VS Code
${workspaceRootFolderName} - the name of the folder opened in VS Code without any slashes (/)
${file} - the current opened file
${relativeFile} - the current opened file relative to workspaceRoot
${fileBasename} - the current opened file's basename
${fileBasenameNoExtension} - the current opened file's basename with no file extension
${fileDirname} - the current opened file's dirname
${fileExtname} - the current opened file's extension
${cwd} - the task runner's current working directory on startup
${lineNumber} - the current selected line number in the active file

tasks.json用于在launch前执行任务,launch.json用于读取执行文件

  • 不使用第三方插件,且只编译单个cpp文件
    首先创建launch.json文件,方法如下所示,选择第一个即可
    1

    1
    2
    3
    4
    5
    6
    7
    8
    9
    10
    11
    12
    13
    14
    15
    16
    17
    18
    19
    20
    21
    22
    23
    24
    25
    26
    {   //launch.json
    "version": "0.2.0",
    "configurations": [
    {
    "name": "g++.exe build and debug active file", //代表任务的名字
    "type": "cppdbg",
    "request": "launch",
    "program": "${fileDirname}\\${fileBasenameNoExtension}.exe", //执行 经过task.json编译完后的exe文件??
    "args": [],
    "stopAtEntry": false, //选为true则会在打开控制台后停滞,暂时不执行程序
    "cwd": "${workspaceFolder}",//当前工作路径:当前文件所在的工作空间
    "environment": [],
    "externalConsole": false,//是否使用外部控制台
    "MIMode": "gdb",
    "miDebuggerPath": "D:\\tools\\compiler\\mingw64-posix-seh\\bin\\gdb.exe",
    "setupCommands": [
    {
    "description": "Enable pretty-printing for gdb",
    "text": "-enable-pretty-printing",
    "ignoreFailures": true
    }
    ],
    "preLaunchTask": "task g++" // must be same to the label in task.json.json
    }
    ]
    }

    然后点击F5,会弹出找不到task.json的错误,直接利用提示新建一个即可。

    1
    2
    3
    4
    5
    6
    7
    8
    9
    10
    11
    12
    13
    14
    15
    16
    17
    18
    19
    20
    21
    22
    23
    24
    25
    {   //task.json
    "version": "2.0.0",
    "tasks": [
    {
    "label": "task g++", // must be same to preLaunchTask in launch.json
    "type": "shell",
    "command": "g++",
    "args": [
    "'-Wall'",
    "'-std=c++17'", //使用c++17标准编译
    "'${file}'", //当前文件名
    "-o", //对象名,不进行编译优化
    "'${fileBasenameNoExtension}.exe'"
    //g++ -Wall -std=c++17 filename.cpp -o filename.exe
    ],
    "group": {
    "kind": "build",
    "isDefault": true
    },
    "problemMatcher": [
    "$gcc"
    ]
    }
    ]
    }

    然后有一个特别关键的点!不要让task.json或者launch.json处于active状态!!!否则会报下面错误:

    1
    2
    ...\.vscode\tasks.json: file format not recognized; treating as linker script
    ...\.vscode\tasks.json:1: syntax error

    上面的意思是把task.json文件当做cpp源文件来编译了,因为上面的args里面的${file}代表当前处于active状态的文件!正确的做法是下面这样:
    2
    最后直接Run就OK了~

  • 不使用第三方插件,且编译多个cpp文件
    此时就需要学习使用makefile或者cmake了,然后把tasks的命令改成调用make等。

Reference

VScode tasks.json和launch.json的设置
Compilling C++ in visual studio code on Ubuntu
Visualstudio Code Doc: Using GCC with MinGW
各种替换变量的意思
Visual Studio Code 如何编写运行 C、C++ 程序?

Github免密提交

进入一个git的目录下,进入.git隐藏文件夹,编辑config文件

1
2
3
[remote "origin"]
url = https://${username}:${password}@github.com/zztttt/LeetCode.git
fetch = +refs/heads/*:refs/remotes/origin/*

即可

目的

为基于hexo的Github Page设置自定义域名

需要准备的材料

  • 一个自己备案过的域名
  • 一个已经部署完成的${username}.github.io网站

获取域名

我采用的是腾讯云的域名,不贵,几十块钱一年。
不过要注意一点,域名注册后必须在规定时间内完成域名实名认证,否则会被注册局暂停解析(Serverhold),无法正常访问!
域名

域名映射

在腾讯云的界面点击解析,进入域名解析列表。
域名解析列表
点击快速添加网站/邮箱解析,选择网站解析,将图中ip填入。
网站解析
ip获取的方式很简单,直接ping ${username}.github.io 即可,会出现以下log

1
2
3
4
5
正在 Ping zztttt.github.io [IP] 具有 32 字节的数据:
来自 IP 的回复: 字节=32 时间=203ms TTL=43

这里的IP就是需要填入的ip。

设置Github Page

进入${username}.github.io仓库,点击setting。设置Custom domain里成你自己的域名
github
耐心等待一段时间即可~

问题

经过以上设置后,看起来访问zztttt.cn可以直接访问到GitHub page,但是当你进行hexo g && hexo d后,会将GitHub page仓库里的setting重置为${username}.github.io,导致每次deploy都需要手动改custom domain,怪麻烦的。
因此查询了一些资料后,得出在blog的source目录下新建一个文件CNAME即可,文件里保存的是自定义域名。
CNAME
这样子操作之后,后来的hexo部署就不会让之前的设置被重置了